Automated dev workflow for using Data Science VM on Azure
tl;dr; I put together a bunch of scripts on Github that let you deploy a VM from your command line as well as sync code from your local directory to the VM easily to be able to use local IDE and git but execute on the powerful remote machine. Perfect for Data Science applications based around jupyter notebook.
In my previous blog post I explained how to do Terraform deployment of an Azure Data Science Virtual Machine.
![]()
Motivation 😓
Recently I started to do some #deeplearning 🔮 as part of my Udacity Artificial Intelligence Nanodegree. When I was working on the #deeplearning Nanodegree last year I started to script starting/stopping an AWS GPU VM and rsyncing code around. This time I felt like giving the Azure Cloud a try. Mostly because my daytime job lets me look at a lot of their services I wanted to venture deeper into the Azure Data Science offerings. Being more of a software developer by trait and less of a data scientist 👨🔬 I often feel like my standards for versioning, testing and ease of development are beyond those that the ML ecosystem offers by default (hope that doesn’t offend the data wizards out there). My development machine is a small MacBook without GPU support. So to train neural networks I wanted to get a Virtual Machine with a GPU on board. Azure offers VMs with a prebaked Ubuntu image containing all of today’s Data Science tools: Python, Conda, Jupyter, GPU Neuralnet libs etc.
- Microsoft R Server 9.2.1 with Microsoft R Open 3.4.1
- Anaconda Python 2.7 and 3.5
- JupyterHub with sample notebooks Spark local 2.2.0 with PySpark and SparkR - Jupyter kernels
- Single node local Hadoop
- Azure command-line interface Visual Studio Code, IntelliJ IDEA, PyCharm, - and Atom
- H2O, Deep Water, and Sparkling Water
- Julia
- Vowpal Wabbit for online learning
- xgboost for gradient boosting
- SQL Server 2017
- Intel Math Kernel Library
See the full stack available on DSVM on the Azure docs
Having the perfect target for running my code I was wondering how to actually keep my local machine my main development machine — meaning I don’t want to setup git on the VM to version my code. This is where our friend rsync comes into the picture 🖼. It lets you sync two directories over SSH.
rsync [OPTION]... SRC [SRC]... [USER@]HOST::DEST
The Goal 🏁
Being prone to over-engineering 🙄 my side projects I started my journey of automating my VM workflow with the following goals:
- Deploy (and delete) an entire VM by a template that I can version on Github
- Start/Stop the VM from my command line so I don’t pay for it if I don’t need it (GPU VMs are 💰💰💰)
- Get code changes I make on the VM using jupyter notebook synchronized to my local machine so I can git commit
Deploy infrastructure 📦
Again I opted for Terraform to deploy the VM. As mentioned in my previous blog post you could also use Azure Resource Manager Templates for that, but my personal favorite is Terraform 😍. So I continued from my previous findings to build the following Terraform recipe. The suggested setup is to place the script into an infra folder into your projects working directory.
anoff/vm-automation - Bootstrap a VM for machine learning applicationsgithub.com
It creates several resources:
- resource group: logical grouping on Azure that contains all the resources below
- virtual network: well..a virtual private network that your - resources use to communicate* network subnet: the subnet that your VPN will use*
- network interface: a network interface so your VM can bind against the virtual network
- virtual machine: the actual compute resource (will spawn disk resources for file system)
- public IP address: a static IP that will make your VM reachable from the internet
- local executor (null resource): used to write some results of the VM creation process onto your disk
* sorry if I did not explain those correctly tbh I am not 💯% sure I understand correctly what they do either 😊

These are the created resources
variable "location" {
  description = "Datacenter location to deploy the VM into"
  default     = "westeurope"
}

variable "vm_name" {
  description = "Name of the virtual machine (acts as prefix for all generated resources)"
  default     = "dsvm"
}

variable "admin_user" {
  description = "Admin username"
  default     = "root"
}

variable "admin_public_key" {
  description = "Path to Public SSH key of the admin user"
  default     = "~/.ssh/id_rsa.pub"
}

variable "admin_private_key" {
  description = "Path to Private SSH key of the admin user"
  default     = "~/.ssh/id_rsa"
}

variable "vm_type" {
  description = "The type of VM to deploy"
  default     = "Standard_NC6"
}
Variables in the Terraform recipe
Leveraging Terraform variables some of the properties of this recipe can be customized.
The easiest way to change the variable values is to config.auto.tfvars file that contains all the variable names and their description as well.
You can find it in the Github repo right next to the Terraform recipe itself. As you can see all variables have a default value even if you not specify the .tfvars properties. The ones you most likely want to modify are admin_public_key and admin_private_key
They are a SSH key pair that you will use to authenticate when connecting to the virtual machine later. During the Terraform process the public key will be stored on the VM so it will later recognize it as a valid key. The private key will be used to SSH into the machine near the end of the process to actually prepare the local file system for later file transfers — namely create a ~/work directory. You might also want to modify the admin username or the resource location.
# Path to Public SSH key of the admin user (required)
admin_public_key = "~/.ssh/id_rsa.pub"

# Path to Private SSH key of the admin user (required)
admin_private_key = "~/.ssh/id_rsa"

# Datacenter location to deploy the VM into (default: westeurope)
#location    = "westeurope"

# Name of the virtual machine (acts as prefix for all generated resources, default: dsvm)"
#vm_name     = "myspecialvm"

# Admin username (default: root)
admin_user = "andreas"

# Type of VM to deploy (default: Standard_NC6 - GPU instance)
#vm_type = "Standard_A1_V2"
config.auto.tfvars
Signing the license terms for Data Science VM ⚖️
You might see the following error when trying to run the Terraform script without having read this far.
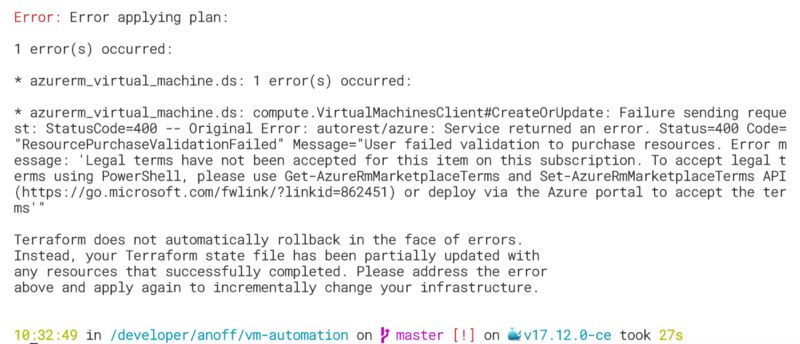
Terraform error due to missing license agreement
The problem is that the DSVM is published via the Azure market place and even though it does not incur additional charges on top of the Azure VM resources you need to read and agree to the license terms. You can do this as described in the error message via Powershell. The complete process of opening a Powershell is explained in this Readme. The short version if you already have Powershell open is to run:
# Use this command to view the current license agreement
$ Get-AzureRmMarketplaceTerms -Publisher "microsoft-ads" -Product "linux-data-science-vm-ubuntu" -Name "linuxdsvmubuntu"
# If you feel confident to agree to the agreement use the following command to enable the offering for your subscription
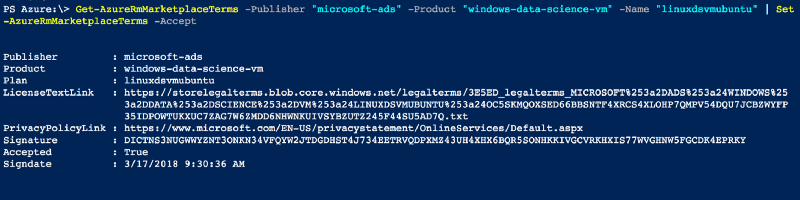
$ Get-AzureRmMarketplaceTerms -Publisher "microsoft-ads" -Product "linux-data-science-vm-ubuntu" -Name "linuxdsvmubuntu" | Set-AzureRmMarketplaceTerms -Accept
After successfully signing the license terms you should see the following output in your shell
Run Terraform 🏃♂️
Once the license terms are signed you can initialize Terraform using terraform init and then can run terraform apply to bring up the infrastructure resources on azure. It may take up 5~10 minutes to fully provision the virtual machine.
After running it you may notice two new files being created. Both contain a link to the created virtual machine. .vm-ip contains the public IP address that was created and will be used to SSH into the machine. .vm-id is the Azure Resource ID of your virtual machine and is a unique identifier that we will use to start/stop the machine later. Both are plain text files and only contain one line, feel free to check them out. The machine is now up and running and you can work with it.
Bring code onto the VM 💁
Before doing any work you might want to upload some bootstrap code onto the virtual machine — or you just want to run an existing jupyter notebook there. Again the Github repository holds a small script that will help you do this (works out of the box on Mac/Unix machines otherwise you need to install make and rsync first).
Place the Makefile into the working directory of your code and make sure to update the PATH definitions to the two files mentioned at the end of the last chapter containing the details of the newly created virtual machine. If you had the Terraform script in a subfolder named infra there is nothing to do. Otherwise you should either copy over the two files into such a directory or modify the PATH definition in the Makefile.
Use make syncup in your working directory (where you placed the Makefile) to sync your local directory content onto the remote machine. You can see the command that is being executed and what the remote directory will be named. In my case it is ~/work/AIND-RNN which is one of my Nanodegree projects. You can also see that the command automatically ignores all files that are defined in your .gitignore which means anything you do not want to version will also not be copied around. This is especially useful for artifacts created during neural net training processes.

Output of make syncup
Run Jupyter Notebook 📒
Let’s assume that your project also holds a Jupyter notebook you want to execute on the remote machine and access from your local browser. You could also use a similar process to execute ANY kind of script on the remote machine.
First you need to SSH into the machine using make ssh which will also do port forwarding for the Jupyter Port 8888 onto your local machine so you can open http://localhost:8888 in your local browser (my MacBook) and connect to the webserver that listens on this port on the virtual machine (Jupyter Notebook). Now that you have a shell running on the DSVM manipulate the file system, install missing packages via pip/conda or just start a process.
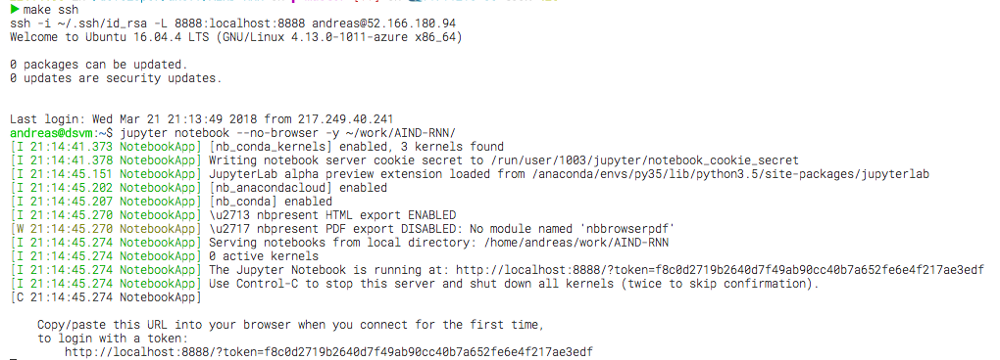
Starting jupyter notebook on the VM
The Jupyter notebook process started above is linked to the lifecycle of the interactive shell that we opened with the SSH connection. Closing the SSH connection will kill the Jupyter server as well. All your code should still be there as Jupyter regularly saves to disk but your python kernel will be gone and all the memory objects (state of notebook execution) will be lost. You will need to execute the notebook again from beginning after you SSH again into the machine and start Jupyter up.
Commit your changes 💾
After you did some changes and you want to git commit like a good developer you need to get those changes you did on the virtual machine to your local development environment. You can do this using make syncdown which will copy all changed remote files onto your local working directory — again only those under git version control.
🚨Make sure you exit the SSH connection first
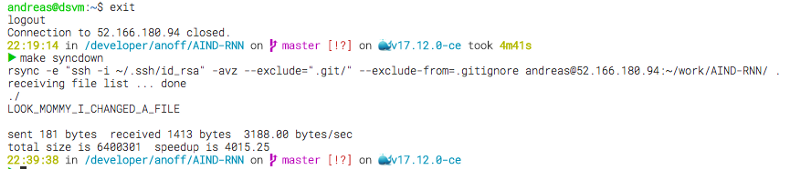
Copy remote changes to local filesystem
The remote file LOOK_MOMMY_I_CHANGED_A_FILE has now been copied to my local working directory and I can use git commit -am "everyone uses meaningful commit messages right?" to commit my changes or use my local tooling to execute unit tests, check codestyle, add some comments…
Start and Stop the Virtual Machine 🎬 🛑
If you have not checked already, you should look up how much the Virtual Machine that you provisioned actually costs you. The Standard_NC6 (which is the cheapest GPU instance) will cost you a small holiday if you keep it running for a month. That is the reason why I wanted an easy way to stop it when I don’t need it and get it back up quickly if I want to continue working.

The Makefile comes with three commands for managing the state of the virtual machine itself. They all require the unique Azure Resource ID located in the .vm-id to select the correct VM in your Azure subscription:
make stop will stop stop the virtual machine AND deallocate the resources which will significantly reduce the costs as you only pay for the disks that hold your data.
make start tells Azure to allocate new resources and spawn up the virtual machine again
make status will tell you if the virtual machine is up or not
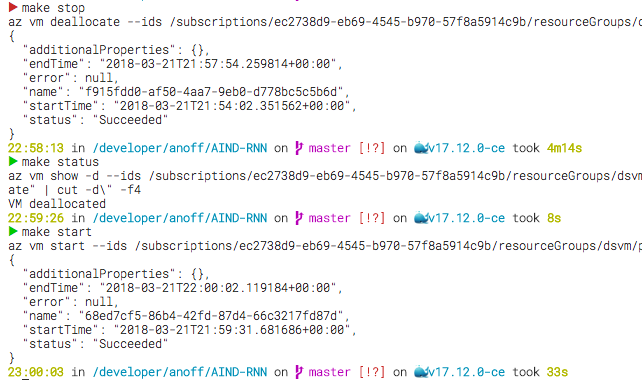
Virtual Machine start/status/stop
The screenshot shows you how long stopping and starting the VM might take. However as soon as you see the CLI saying Running you can shut down your local machine as Azure started deallocating your resources.
Reduce risk of bankruptcy 💸
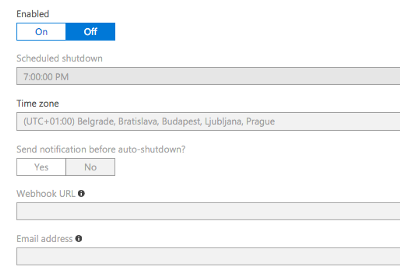
If you are afraid of the bill that might come flying in if you miss stopping the virtual machine you should take a closer look at the auto shutdown features that Azure offers you. It lets you specify a time at which the VM will automatically shut down every day.
But let me tell you from experience — if you accidentally keep it up for a weekend and see the bill the next week you will always shutdown from then on. That was actually one of the reasons why I wanted to make this workflow as easy as possible.
Summary 📚
Well I hope you liked this article and found some helpful tips. The general workflow can also be done with AWS machines but the Terraform template will look different. Feel free to submit a PR to my Repo and I will add the option to also use AWS resources.
I would love to hear feedback via Issues, Twitter 🐦 or comments. One thought I have is to bundle all the commands into a binary CLI so it works cross platform and can just be installed by copying around a single file. If you’re interested please let me know😻
Here is another look at all the commands you can use🧙♀️
![]()
/andreas