Running influxdb on Raspberry Pi using Docker compose
This blog post will explain how you can setup influxdb (and the telegraf plugin) on your Raspberry Pi using docker-compose. We will use the config-as-code to create a reproducible setup. This is extremely helpful for hobby projects that you come back to every now-and-then because you can lookup exactly what you are running 😉
The individual steps we need to take:
- Overview
- Prerequisites
- Preparing the influxdb working directory
- Start influxdb via docker-compose
- Access your influxdb instance via shell
- Summary
Overview
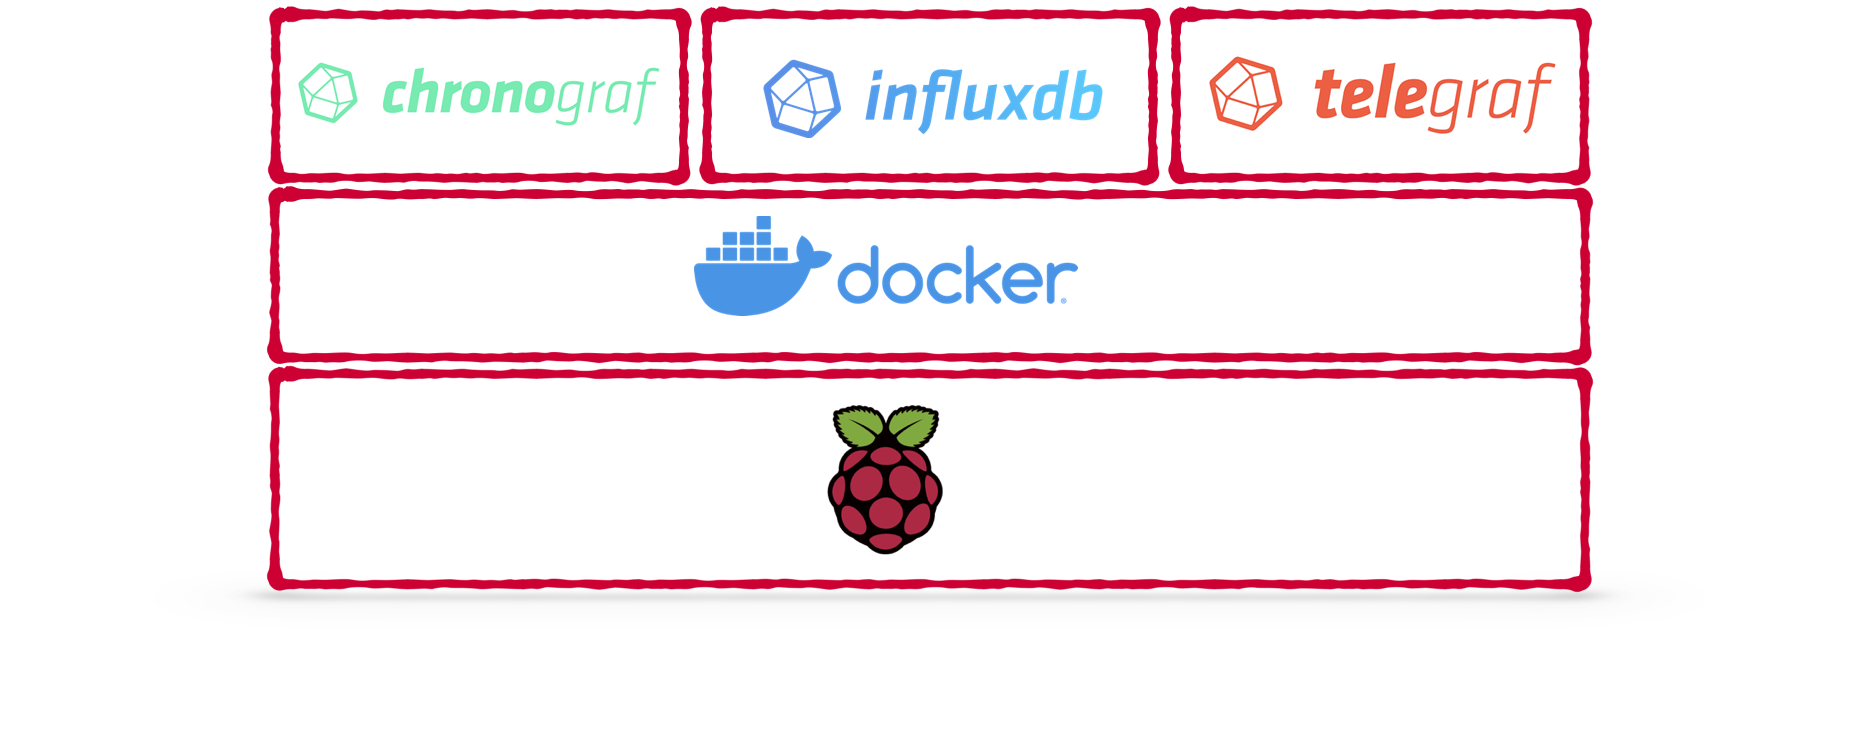
A quick overview of the service architecture that will be built with this setup.
- InfluxDB exposing a port into your home network
- Chronograf as Admin UI, only accessible from within your Raspberry Pi
- Telegraf to ingest system metrics

Prerequisites
You will need to have a Raspberry Pi with Docker and docker-compose installed. See my previous blog post if you do not know how to do that How to setup Raspberry Pi as home server with Docker support. Your pi also needs to have an active internet connection and you need access it’s terminal, either via SSH or direct keyboard.
Preparing the influxdb working directory
To persist data and configuration of your influxdb instance you need to create a directory on your Raspberry system that will be used by docker.
Creating folder structure
I suggest creating this structure directly in your home directory. This way you will not have to worry about permissions too much. To keep things clean, put all your docker mounts into a common folder.
$HOME/docker/
├── influxdb/
│   ├── data/ # influxdb working directory (where your actual data is stored)
│   ├── init/ # some init scripts to bootstrap the instance
│   ├── influxdb.conf # config for influxdb instance
│   └── telegraf.conf # config for telegraf instance
└── compose-files/
    └── influxdb
        ├── .env # file containing user secrets
        └── docker-compose.yml # specification of docker containers to run
Create the directories with these commands
# do this on your raspi
mkdir -p $HOME/docker/influxdb/data
mkdir -p $HOME/docker/influxdb/init
mkdir -p $HOME/docker/compose-files/influxdb
Create influxdb.conf and telegraf.conf
To create a default config for influxdb in the newly created working directory run the following command
cd $HOME/docker/influxdb
docker run --rm influxdb influxd config > influxdb.conf
# 💡 for influx v2 you need to use `print-config` instead of `config` -> docker run --rm influxdb influxd print-config > influxdb.conf
#     kudos to the reader that tipped me of about this difference
# next do some modifications to the default config
# enable HTTP auth
sed -i 's/^  auth-enabled = false$/  auth-enabled = true/g' influxdb.conf
# do any other changes you want, or replace with your own config entirely
Next create the config file for telegraf and do some modifications.
Please note <telegrafUSERpassword> and create your own password here.
cd $HOME/docker/influxdb
docker run --rm telegraf telegraf config > telegraf.conf
# now modify it to tell it how to authenticate against influxdb
sed -i 's/^  # urls = \["http:\/\/127\.0\.0\.1:8086"\]$/  urls = \["http:\/\/influxdb:8086"\]/g' telegraf.conf
sed -i 's/^  # database = "telegraf"$/  database = "telegraf"/' telegraf.conf
sed -i 's/^  # username = "telegraf"$/  username = "telegraf"/' telegraf.conf
sed -i 's/^  # password = "metricsmetricsmetricsmetrics"$/  password = "<telegrafUSERpassword>"/' telegraf.conf
# as we run inside docker, the telegraf hostname is different from our Raspberry hostname, let's change it
sed -i 's/^  hostname = ""$/  hostname = "'${HOSTNAME}'"/' telegraf.conf
After those modifications your file should have the following (and a lot more) entries:
[agent]
  hostname = "${PI_HOSTNAME}"
[[outputs.influxdb]]
  urls = ["http://influxdb:8086"]
  database = "telegraf"
  ## HTTP Basic Auth
  username = "telegraf"
  password = "<telegrafUSERpassword>"
Create Init Script for Telegraf database & user
As good security practice we do not want telegraf to operate with the admin account of influxdb, instead create a separate account.
Making use of the init scripts feature of the influxdb docker container, we can create influxQL scripts in the influxdb/init folder that will be executed on first start of the container.
Create the following script at $HOME/docker/influxdb/init/create-telegraf.iql.
This creates a database with 31 days retention - modify password and retention to your liking.
CREATE DATABASE telegraf WITH DURATION 31d
CREATE USER telegraf WITH PASSWORD '<telegrafUSERpassword>'
GRANT WRITE ON telegraf to telegraf
⚠️ Make sure to use the same password as in the telegraf.conf.
Create docker-compose specification
Create the following file at $HOME/docker/compose-files/influxdb/docker-compose.yml
version: "3"

networks:
  metrics:
    external: false

services:
  influxdb:
    image: influxdb:latest
    container_name: influxdb
    restart: always
    networks: [metrics]
    ports:
      - "8086:8086"
    volumes:
      - $HOME/docker/influxdb/data:/var/lib/influxdb
      - $HOME/docker/influxdb/influxdb.conf:/etc/influxdb/influxdb.conf:ro
      - $HOME/docker/influxdb/init:/docker-entrypoint-initdb.d
    environment:
      - INFLUXDB_ADMIN_USER=${INFLUXDB_USERNAME} # sourced from .env
      - INFLUXDB_ADMIN_PASSWORD=${INFLUXDB_PASSWORD} # sourced from .env
  telegraf:
    image: telegraf:latest
    restart: always
    container_name: telegraf
    networks: [metrics]
    volumes:
      - $HOME/docker/influxdb/telegraf.conf:/etc/telegraf/telegraf.conf:ro
  chronograf:
    container_name: chronograf
    restart: always
    image: chronograf:latest
    ports:
      - "127.0.0.1:8888:8888"
    depends_on:
      - influxdb
    networks: [metrics]
    environment:
      - INFLUXDB_URL=http://influxdb:8086 # needs to match container_name
      - INFLUXDB_USERNAME=${INFLUXDB_USERNAME} # sourced from .env
      - INFLUXDB_PASSWORD=${INFLUXDB_PASSWORD} # sourced from .env
We also add chronograf as an Admin UI for influxdb into the container setup.
However chronograf does not support any authentication so we allow it only to be accessed from the machine that runs docker directly i.e. our Raspberry Pi.
So even though it looks odd please do not change "127.0.0.1:8888:8888" as this makes sure this port is only accessible from the localhost.
Later on you will learn how to reach this from outside the Raspberry system though.
Adding the restart: always to the service makes sure it gets started automatically after rebooting your Raspberry Pi.
Insert user secrets into docker recipe
As you saw in the docker-compose.yml it does not contain the actual usernames and secrets.
These will be read from a (hopefully secret) .env file that you need to place next to the yml at $HOME/docker/compose-files/influxdb/.env
INFLUXDB_USERNAME=admin
INFLUXDB_PASSWORD=<superSECRETinfluxPASSWORD>
Start influxdb via docker-compose
Now it is finally time to startup all containers for the first time!
cd $HOME/docker/compose-files/influxdb
docker-compose up -d # -d will start the containers in "detached" mode so they continue running after you close the shell
To check if everything is running fine you can run docker ps and see the following output

Access your influxdb instance via shell
With your docker container running you can use the following command to create an interactive influx shell
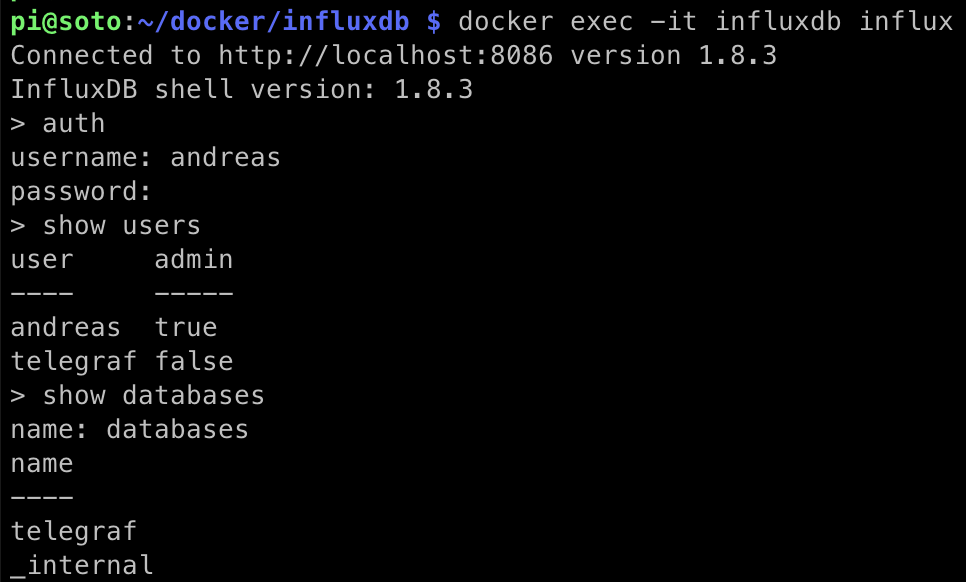
docker exec -it influxdb influx
Authenticate with the admin user (remember the .env file) in order to look at all users and databases).
Then you can use the SHOW USERS and SHOW DATABASES commands.
With my username and pi hostname it looks like this:
If anything up until this point did not correctly and you do not have the telegaf user and database I suggest cleaning up everything and restarting.
# 🚨 ONLY DO THIS if you have issues, this will delete your setup
cd $HOME/docker/compose-files/influxdb
docker-compose rm --stop --force # stop and delete all containers
docker system prune --force
sudo rm -rf $HOME/docker/influxdb/data/* # remove all files created by influx so far
Access the chronograf web UI
As mentioned earlier the chronograf UI does not offer any application level authentication. This is why the application is secured on a network level by making it only accessible from the Raspberry itself. To be able to access the dashboard from outside the raspi you can do temporary port forwarding via SSH using the following command
# run this on your computer
ssh pi@mypi -L 8888:localhost:8888 -N
# now you can enjoy the chronograf UI on localhost:8888 on your computer as well
# once you are done kill the SSH process to stop the port forwarding
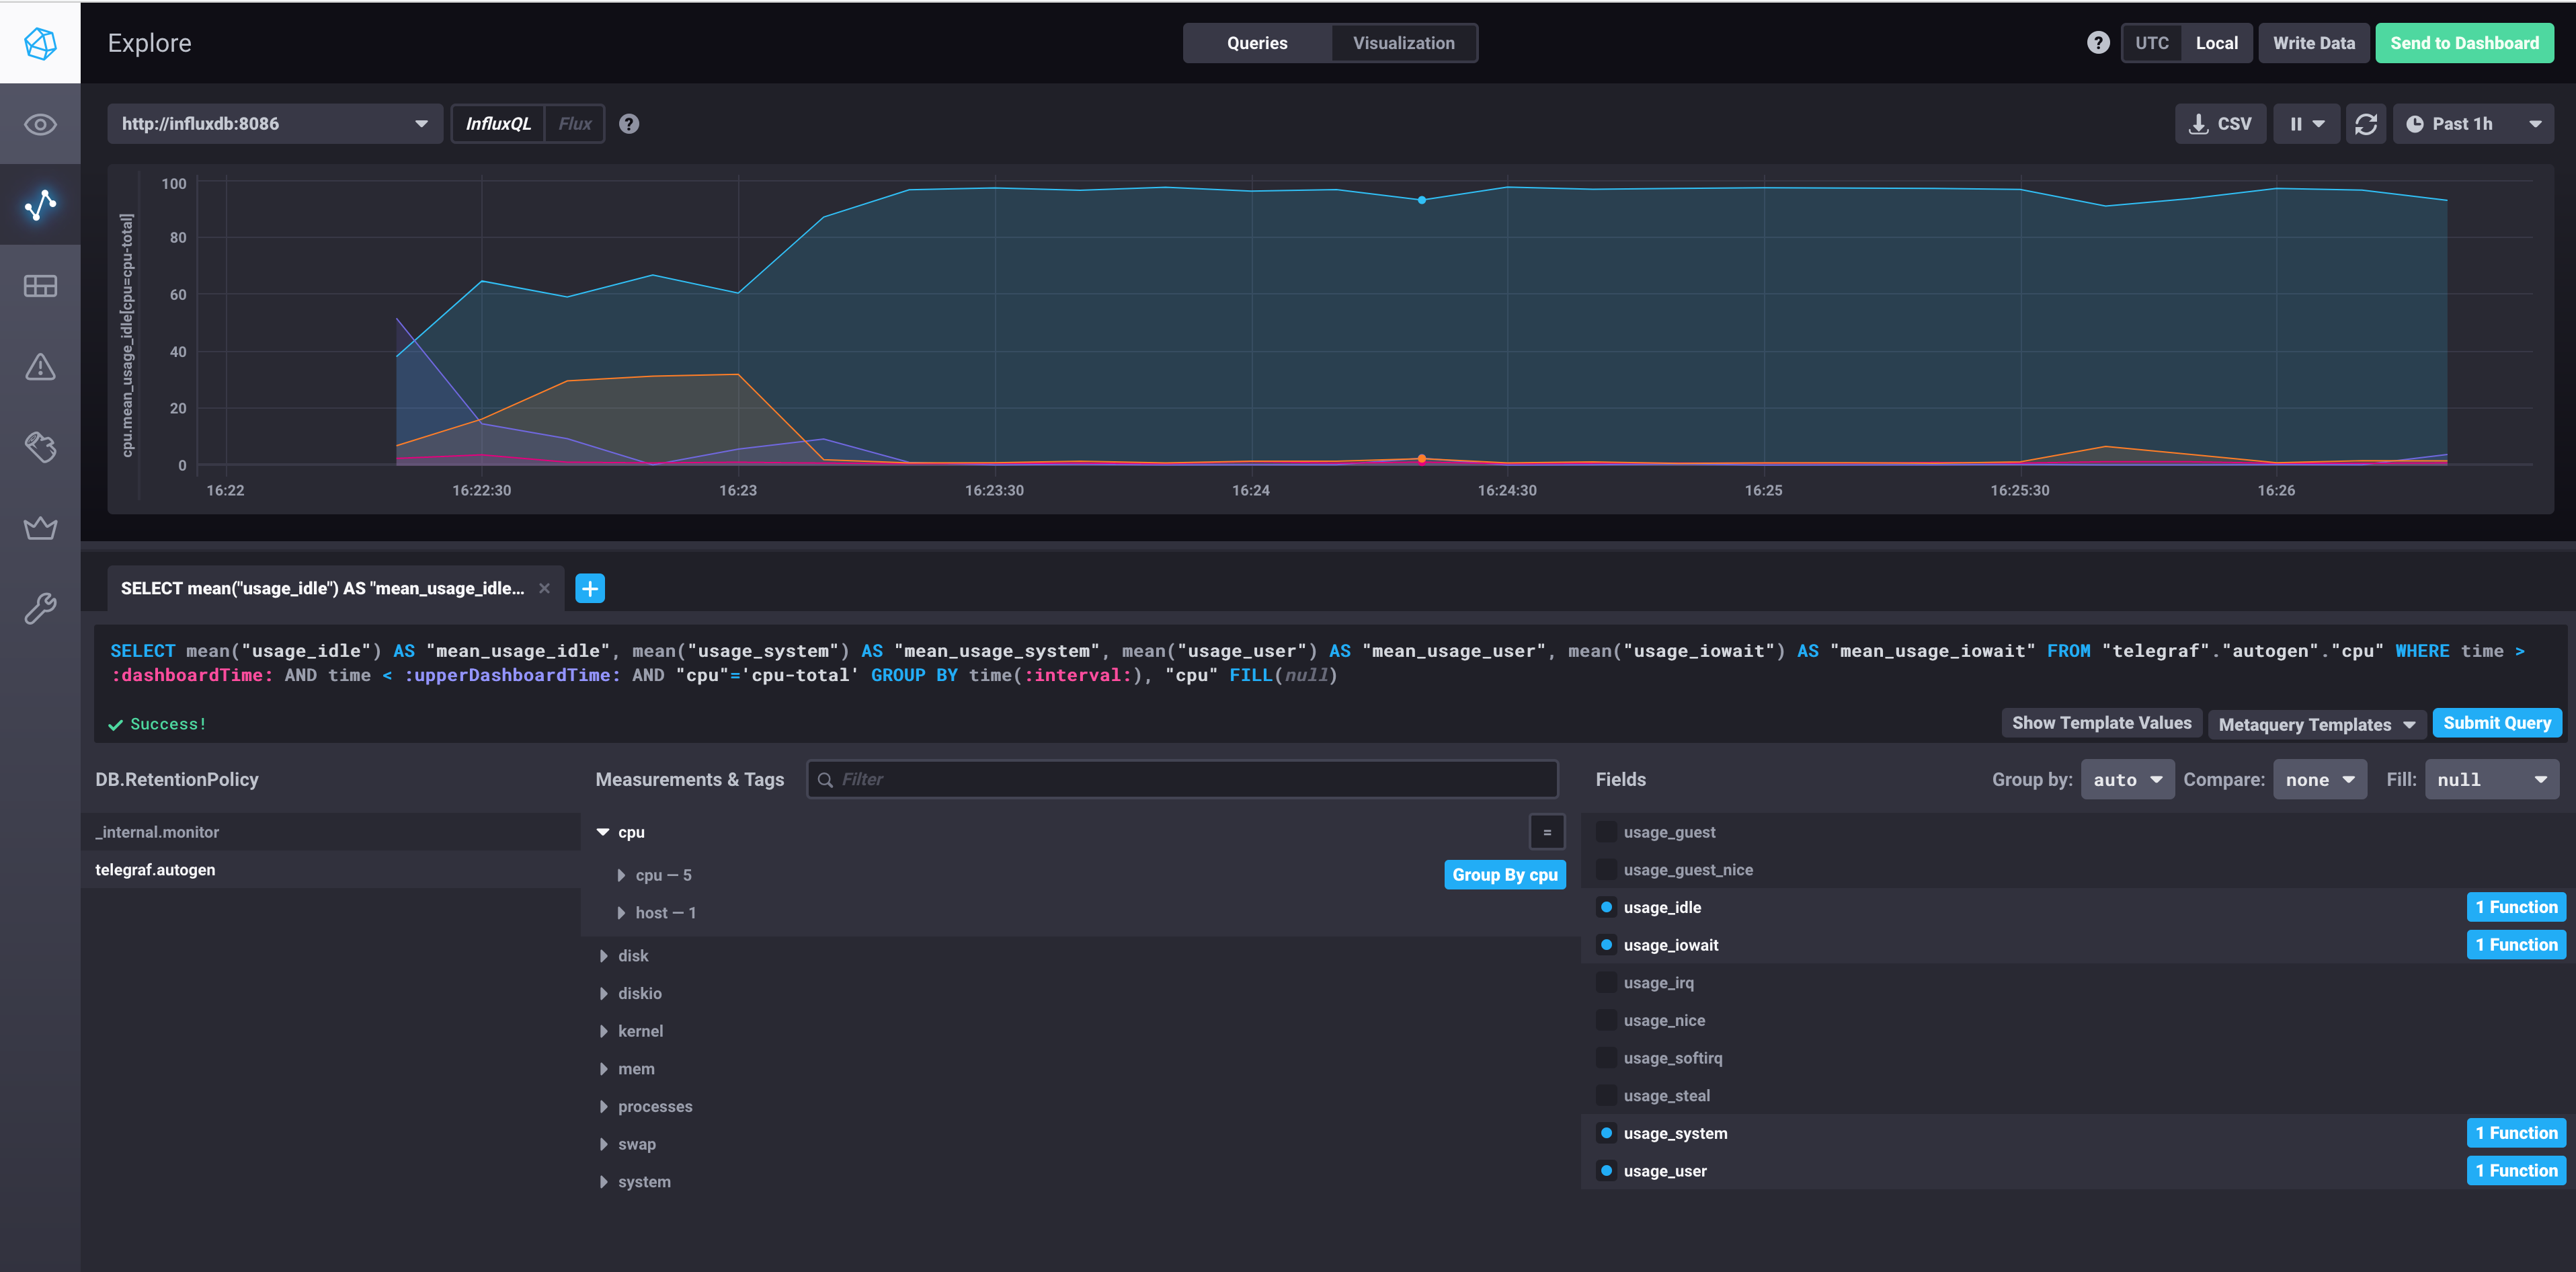
Try navigating to the Explore tab on the left and paste the following query to look at your CPU statistics that were reported by the telegraf container.
SELECT mean("usage_system") AS "mean_usage_system", mean("usage_user") AS "mean_usage_user", mean("usage_iowait") AS "mean_usage_iowait", mean("usage_idle") AS "mean_usage_idle" FROM "telegraf"."autogen"."cpu" WHERE time > :dashboardTime: AND time < :upperDashboardTime: AND "cpu"='cpu-total' GROUP BY time(:interval:) FILL(null)
Summary
Looking back at the original architecture diagram, these are the main services we created.
- influx endpoint is reachable from within your home network
- secured via basic auth
- telegraf is collecting system metrics
- reporting them to influx over the authenticated HTTP channel
- chronograf UI is running on your Raspberry Pi
- you learned how to port-forward the chronograf port to your computer and view the dashboard
- docker containers will autostart if you reboot your Raspberry Pi
If any of this is outdated or does not work for you please leave a comment or reach out via Twitter. Appreciate the feedback 👋