
Migrating to Azure Pipelines
Beginning of the year I switched my blogs build chain from Travis CI to drone CI. Due to some tasks with Azure DevOps at work I wanted to test how good it fits my private projects. In this post I will NOT tell you how to set up your pipelines project because Microsoft has great docs for that. Instead this post will cover how to best put your build workflow into a pipeline specification. In addition I will cover the necessary steps to migrate existing CI/CD workloads from Travis and drone to Azure Pipelines.
Readers should be familiar with bash, yaml and basic docker concepts.
Introduction to Azure Pipelines 👋
Azure Pipelines is part of the Azure DevOps* service. The service aims to provide a web based collaboration platform with issue management, git hosting, test and release management. Similar to the Atlassian stack (Jira + BitBucket + Bamboo) or the GitLab stack.
*) worst name ever
See the announcement Microsoft made last year about the introduction of the service for details.
Introducing Azure DevOps
Posted on 10 September 2018
The single service that was Visual Studio Team Services (VSTS) is now becoming a new set of Azure DevOps services. Throughout our documentation and websites, and in the product, you’ll start to notice new icons and names for Azure DevOps and each of the services within it:
- Azure Pipelines to continuously build, test, and deploy to any platform and cloud.
- Azure Boards for powerful work management.
- Azure Artifacts for Maven, npm, and NuGet package feeds.
- Azure Repos for unlimited cloud-hosted private Git repos.
- Azure Test Plans for planned and exploratory testing.
— Azure DevOps Newsletter
Specifying pipelines with YAML syntax
Although the default way pipelines are configured is the UI on dev.azure.com I strongly advise to use the new YAML based configuration method. This way you can to configure (almost) your entire build behavior versioned with your sourcecode. The YAML syntax also allows multi-stage builds.
Azure Pipelines hierarchy
The YAML hierarchy has (starting on the lowest level):
- Steps execute an action
- Jobs group multiple steps
- run in parallel by default (if sufficient quota)
- run on individual agents i.e. work directories are not shared
- define error behavior
- create artifacts and publish within a single job
- Stage groups multiple jobs
- allows to fan-in parallel jobs
- structure larger pipelines into functional groups
- Pipeline your definition
- one pipeline per YAML file
- you can have multiple YAML files in one repository and create multiple Pipelines for one repository, but Azure does not assume any relationship between them -> handling pipeline status is up to you
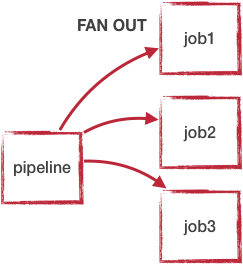
Fan-In and Fan-Out pipeline jobs 🍾
Without specifying stages and job concurrency the jobs in your pipeline will run in parallel. If one step in a job fails the job will stop executing but other jobs will continue executing.
Multiple Jobs within a pipeline are a Fan-Out scenario as they get executed in parallel.
Example for a simple stage-less pipeline
pool:
  vmImage: 'ubuntu-latest'
jobs:
- job: job1
  steps:
  - bash: echo "Hello world"
  - bash: echo "Nothing else to do"
- job: job2
  steps:
  - bash: echo "I echo more or less at the same time"
  - bash: echo "Welcome world"
  - bash: echo "Really nothing else to do"
Pipeline execution without stage
By specifying Stages you can execute fan-out and fan-in multiple times within your pipeline. Each Stage represents a fan-in operation where all defined jobs need to finish before the next stage is triggered which can fan-out again.
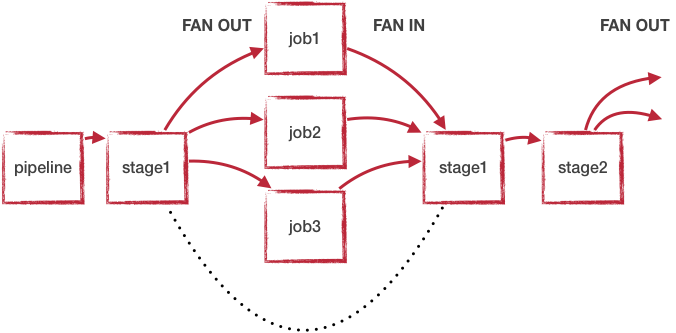
Looking back at the hierarchies existing the YAML file the actual execution pattern can be described with the state machine below. Only one stage is executing at a time; if possible all jobs within this stage are executed in parallel.
Pipeline with two stages
Migrating from drone to Azure Pipelines 🚐
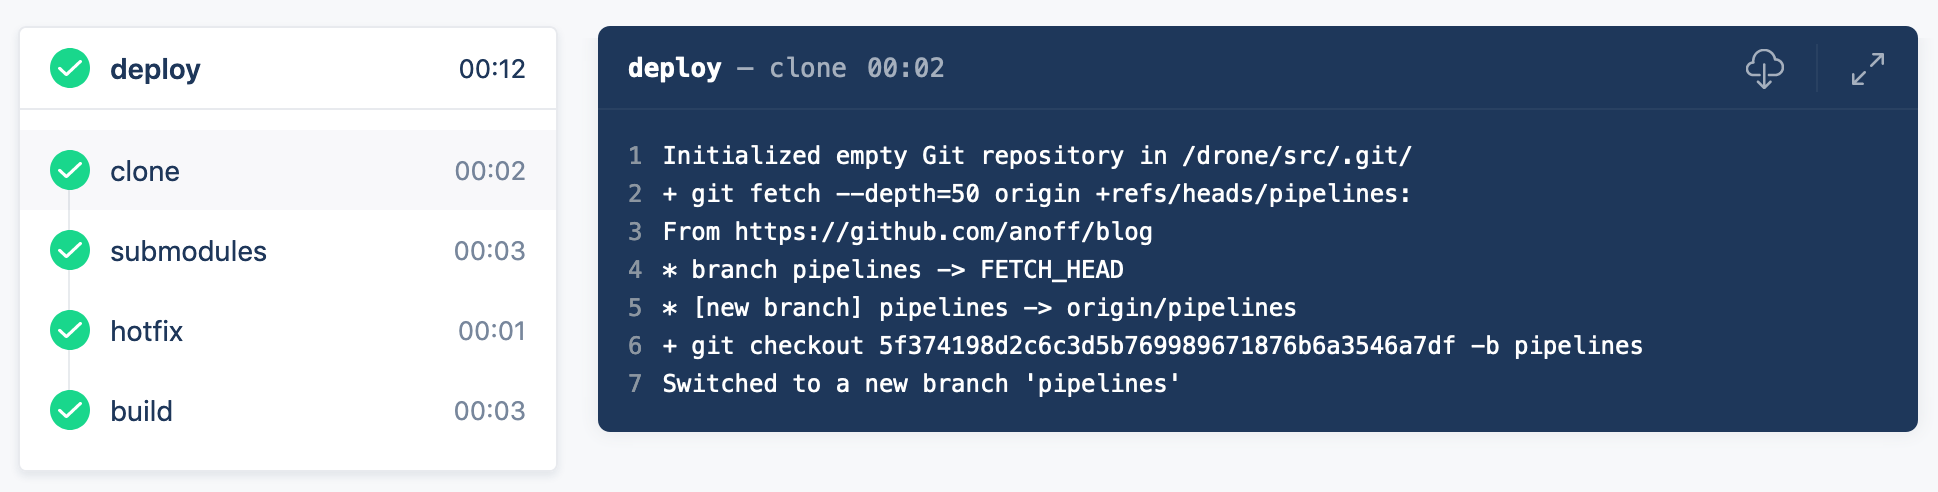
The first CI/CD workload I moved to Azure Pipelines was this blog. As you can see in the image below, this is a very simple pipeline with just a few steps and no fan-in/fan-out behavior.
CI steps in the existing drone pipeline
The drone pipeline was already relying on a custom docker image as described in this previous blog post about rendering asciidoc in hugo. That made the migration quite easy as there is not a lot of customization to the build agent necessary. All required tools to run the pipeline are encapsuled in that docker image.
I played around with various plugins available on the DevOps marketplace for Docker, Hugo and GitHub pages deploy but they either did not support the use case I have or ran outdated versions of the tools and did not let me update. Now let’s compare the actual pipeline definition.
drone pipeline config
kind: pipeline
name: deploy

clone:
  depth: 50

steps:

- name: submodules ①
  image: docker:git
  commands:
  - git submodule update --init --recursive --remote

- name: hotfix ②
  image: anoff/hugo-asciidoctor
  commands:
  - cp -R theme_fixes/** themes/bilberry-hugo-theme
  - cp -R theme_fixes/** themes/bilberry-hugo-theme-fork

- name: build ③
  image: anoff/hugo-asciidoctor
  commands:
  - hugo --gc --minify -d _site --baseURL https://blog.anoff.io
  - touch _site/.nojekyll

- name: publish ④
  image: plugins/gh-pages
  settings:
    username:
      from_secret: github_username
    password:
      from_secret: github_token
    pages_directory: _site
  when:
    branch:
    - master
- Clone the repository content
- Hotfix something in the hugo theme by copying over files
- Create HTML content by running Hugo
- Publish HTML
drone pipeline config
trigger:
- master

variables:
- group: integration
pool:
  vmImage: 'ubuntu-latest'

steps:
- checkout: self ①
  displayName: 'Git checkout'
  submodules: true

- task: Bash@3 ②
  displayName: 'Hotfix theme'
  inputs:
    targetType: 'inline'
    script: cp -R theme_fixes/** themes/bilberry-hugo-theme
- task: Bash@3 ③
  displayName: 'Build HTML'
  inputs:
    targetType: 'inline'
    script: |
      docker run --rm -v $PWD:/app anoff/hugo-asciidoctor hugo --gc --minify -d _site
      cp -R _site/* $(Build.ArtifactStagingDirectory)/

- task: PublishPipelineArtifact@0 ③
  displayName: 'Publish artifact'
  inputs:
    artifactName: 'blog'
    targetPath: '$(Build.ArtifactStagingDirectory)'

- task: Bash@3 ④
  inputs:
    targetType: 'inline'
    script: |
      git clone https://anoff:$(github_token)@github.com/anoff/blog.git --branch=gh-pages ./ghpages
      cd ./ghpages
      git config core.autocrlf false
      git config user.email ""
      git config user.name "CI Joe"
      rm -rf *
      cp -R $(Build.ArtifactStagingDirectory)/* .
      echo blog.anoff.io > CNAME
      git add .
      git commit --allow-empty -m 'Automated build #$(Build.BuildNumber)'
      git push
  displayName: 'Publish to gh-pages'
- Clone the repository content
- Hotfix something in the hugo theme by copying over files
- Create HTML content by running Hugo
- Publish HTML
You can find the drone CI definition and Azure Pipelines YAML in my GitHub repo.
The necessary steps for this migration were:
- Write the Azure Pipelines YAML specification for my pipeline
- Create Azure DevOps project
- Create a variables group containing the secrets for the GitHub repo (to push
gh-pagesbranch) - Set up a new pipeline referencing my YAML
- Switch off the drone CI service for the repo
- Change CI badge in README to
✅
CI steps in the new Azure Pipeline

Migrating from Travis CI
Another project I migrated was a simple Node.js project azure-keyvault-secretstore.
Previously the build was done via Travis CI and only used the default Node.js behavior of Travis; doing an npm ci (install dependencies) and npm test to run any tests.
However this one used a build matrix to execute tests on multiple Node.js versions in parallel.
This is something Azure Pipelines supports as well with the strategy:matrix property.
Comparison of the two configurations shows only slight differences in the syntax and the fact that Travis auto-assumed npm test as a default command in Node.js environments
Travis CI configuration
language: node_js
node_js:
  - '8'
  - '10'
  - '12'
after_script: ①
- 'cat coverage/lcov.info | ./node_modules/.bin/coveralls'
- Travis uses
(before|after)_scripttags to separate a build in up to three steps, in thisafterstep the code coverage results generated duringnpm testare uploaded to coveralls
Azure Pipelines configuration
pool:
  vmImage: 'ubuntu-latest'
strategy:
  matrix:
    node_8:
      node_version: '8'
    node_10:
      node_version: '10'
    node_12:
      node_version: '12'

steps:
- task: NodeTool@0
  inputs:
    versionSpec: $(node_version) ①
- bash: npm ci ②
- bash: npm test ③
- bash: 'cat coverage/lcov.info | ./node_modules/.bin/coveralls' ④
- set an explicit Node.js version on the agent
- install dependencies
- run unit tests and generate code coverage
- upload code coverage results, this step still fails 🐞 because the
coverallsmodule for Node.js does not yet support Azure Pipelines as runtime environment
Besides steps being made explicitly the Azure Pipelines config is very similar to the Travis CI configuration. Migration is merely setting up an account and getting into the Azure Pipelines YAML syntax.
Some things to look out for when using Azure Pipelines 🐞
Here are some things that I learned over time and I hope will be fixed soon.
FIXED: Scheduled jobs only run when people use the UI
📌 NOTE
Update 2020-03-29: This issue seems fixed by now. Scheduled jobs run regardless of user interaction on the UI.
As described in the FAQ of Pipelines a scheduled job only runs ONCE after the last person logs out (active session) the Azure DevOps UI.
My build didn’t run. What happened?
Someone must view a page in your organization regularly for CI and scheduled builds to run. It can be any page, including, for example, Azure Pipelines.
Your organization goes dormant five minutes after the last user signed out of Azure DevOps. After that, each of your build pipelines will run one more time. For example, while your organization is dormant:
- A nightly build of code in your organization will run only one night until someone signs in again.
- CI builds of an Other Git repo will stop running until someone signs in again.
— Azure DevOps FAQ
This is by far the worst restriction that Azure Pipelines has in my opinion. It basically will not run nightly builds over the weekend.
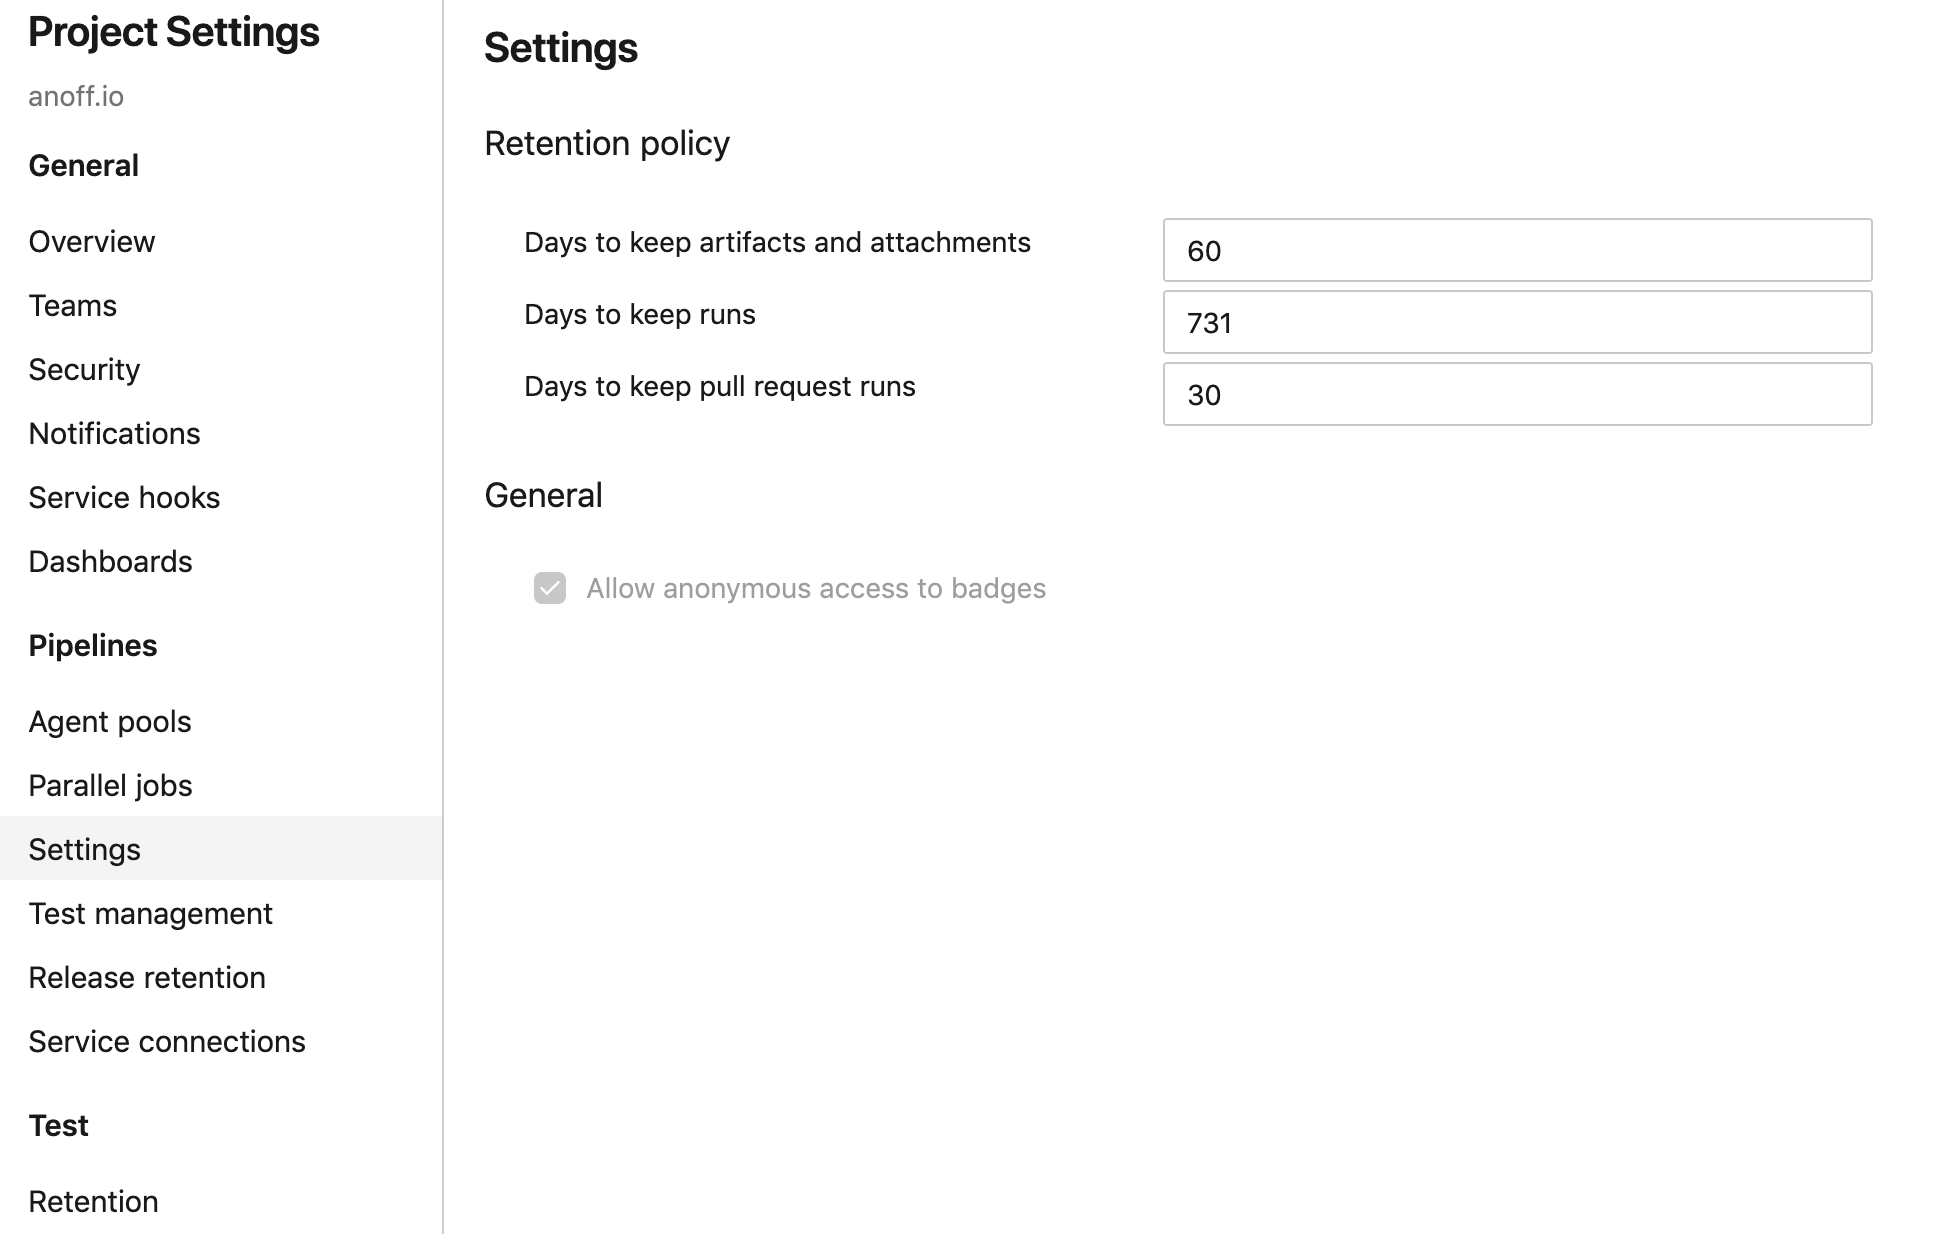
By default pipeline executions are removed after 30 days
This is something you can - and probably should - reconfigure. You can actually set this value to as high as 2 years. So I do not understand why the default is just a month.
Configure pipeline retention in the project settings
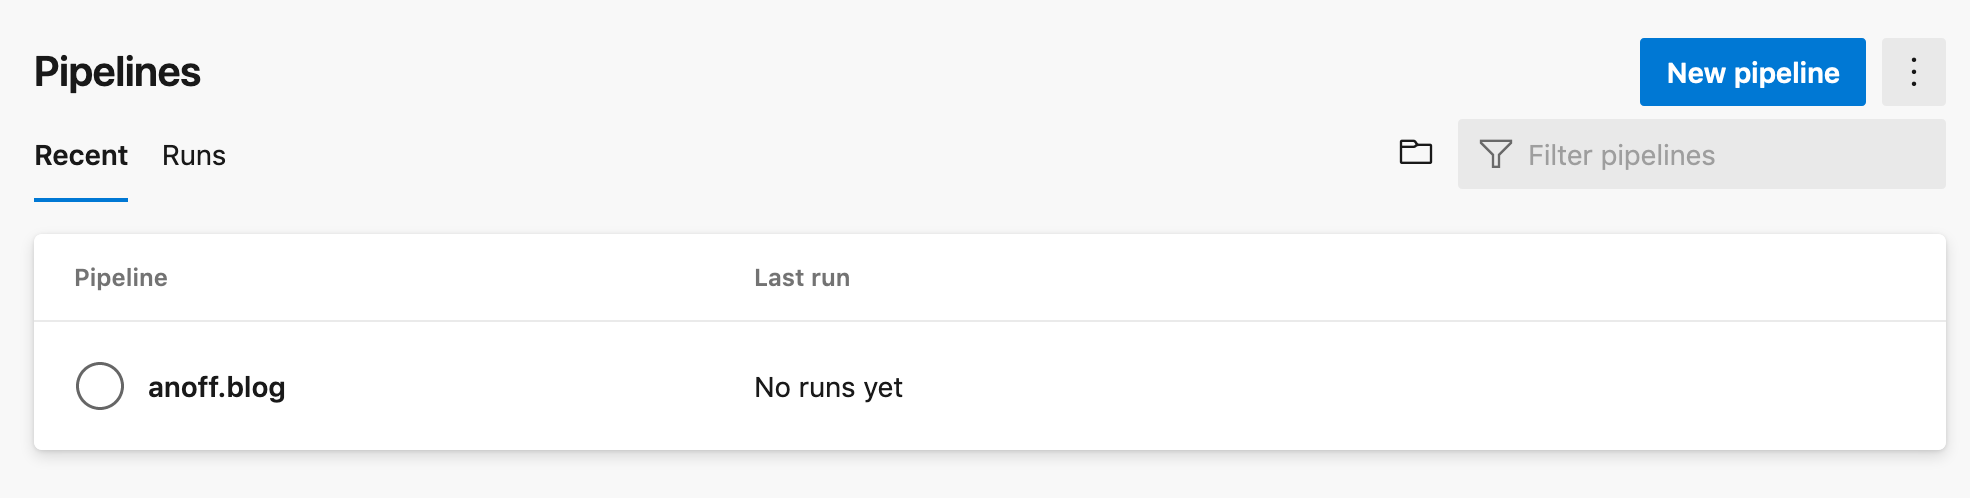
The worst thing is that Keeping a run not only means keeping the logs but actually after those 30 days Pipelines does not even know there ever was a run. The image below was taken today, where the last commit - and pipeline execution - was more than 30 days old. It seems like the pipeline never ran at all.
I wish they just deleted the logs but kept the meta-data like date, run result and related commit ID.
All past pipeline executions are completely gone
YAML spec seems over-complicated
Having used Travis CI, drone and GitLab CI before I have to say the YAML syntax just feels bloated. There are many more things you can configure compared to Travis but after the few pipelines I built I already found that these options often do match my use case and I end up writing hand-crafted inline scripts instead of using the provided tasks as well.
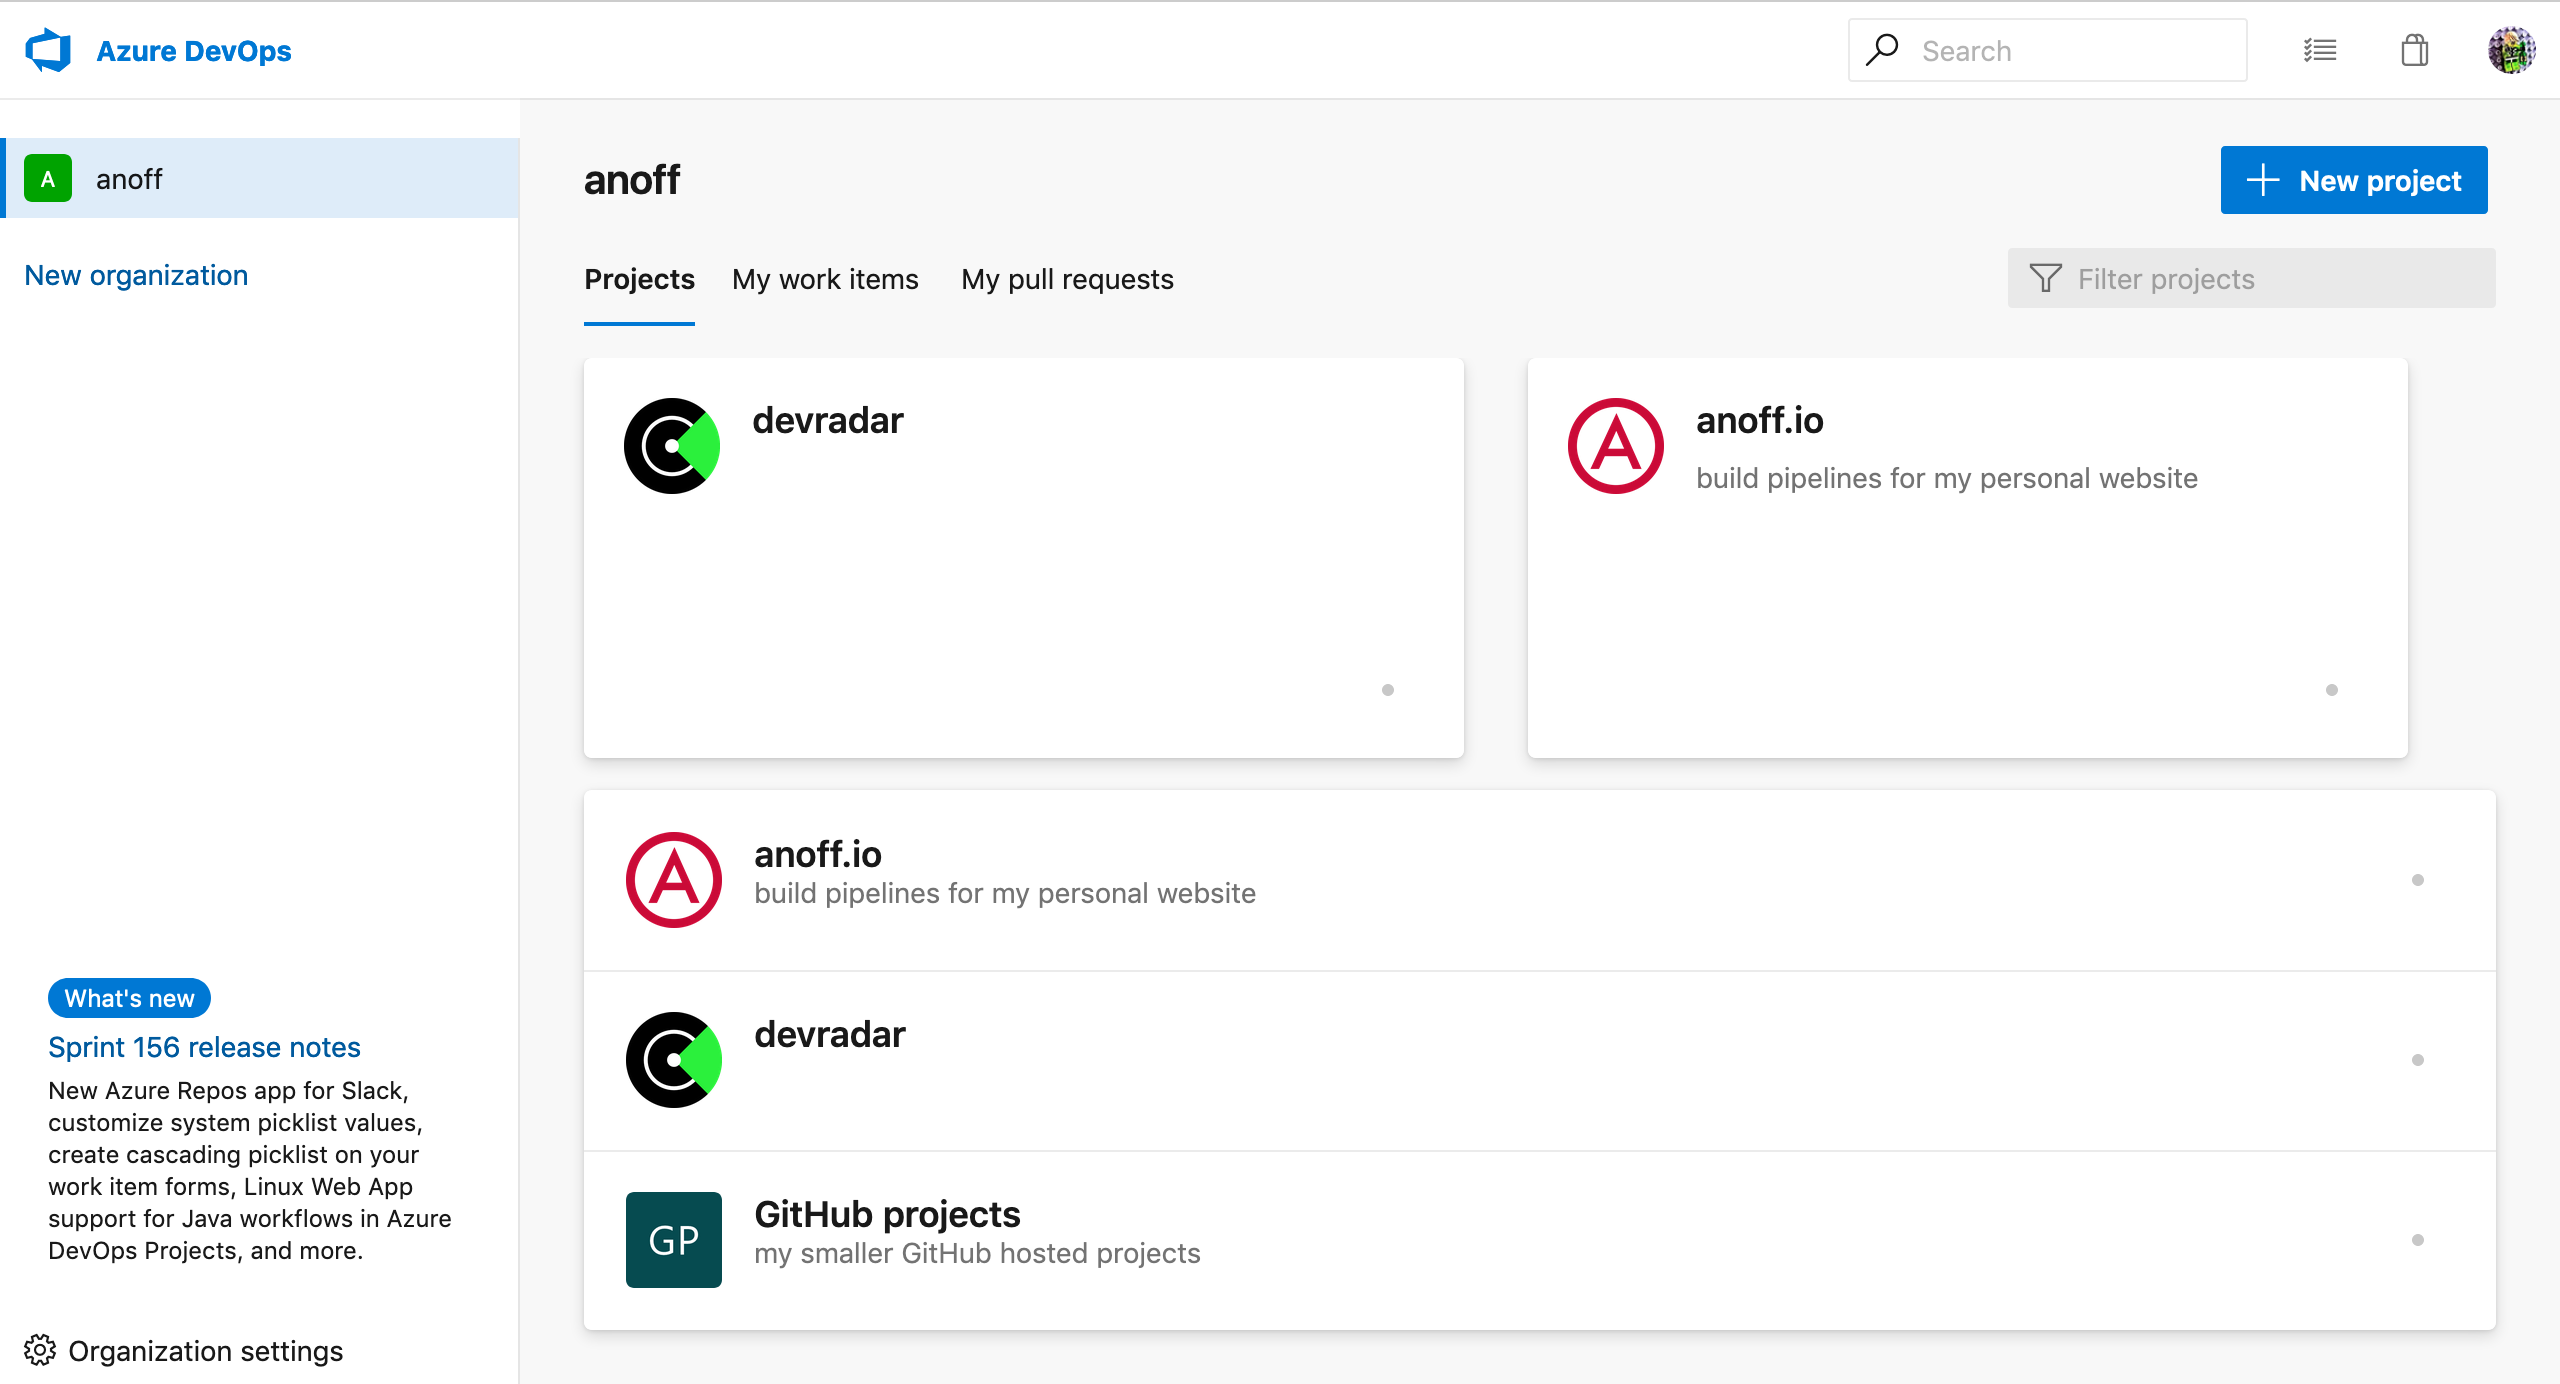
Azure DevOps Project/Pipeline structure
In Azure DevOps you can have a project that has multiple repositories and multiple pipelines. There is no 1:1 relationship between repos and pipelines. Multiple projects are grouped into an organization.
Azure DevOps project overview
Azure Pipelines overview for a given project
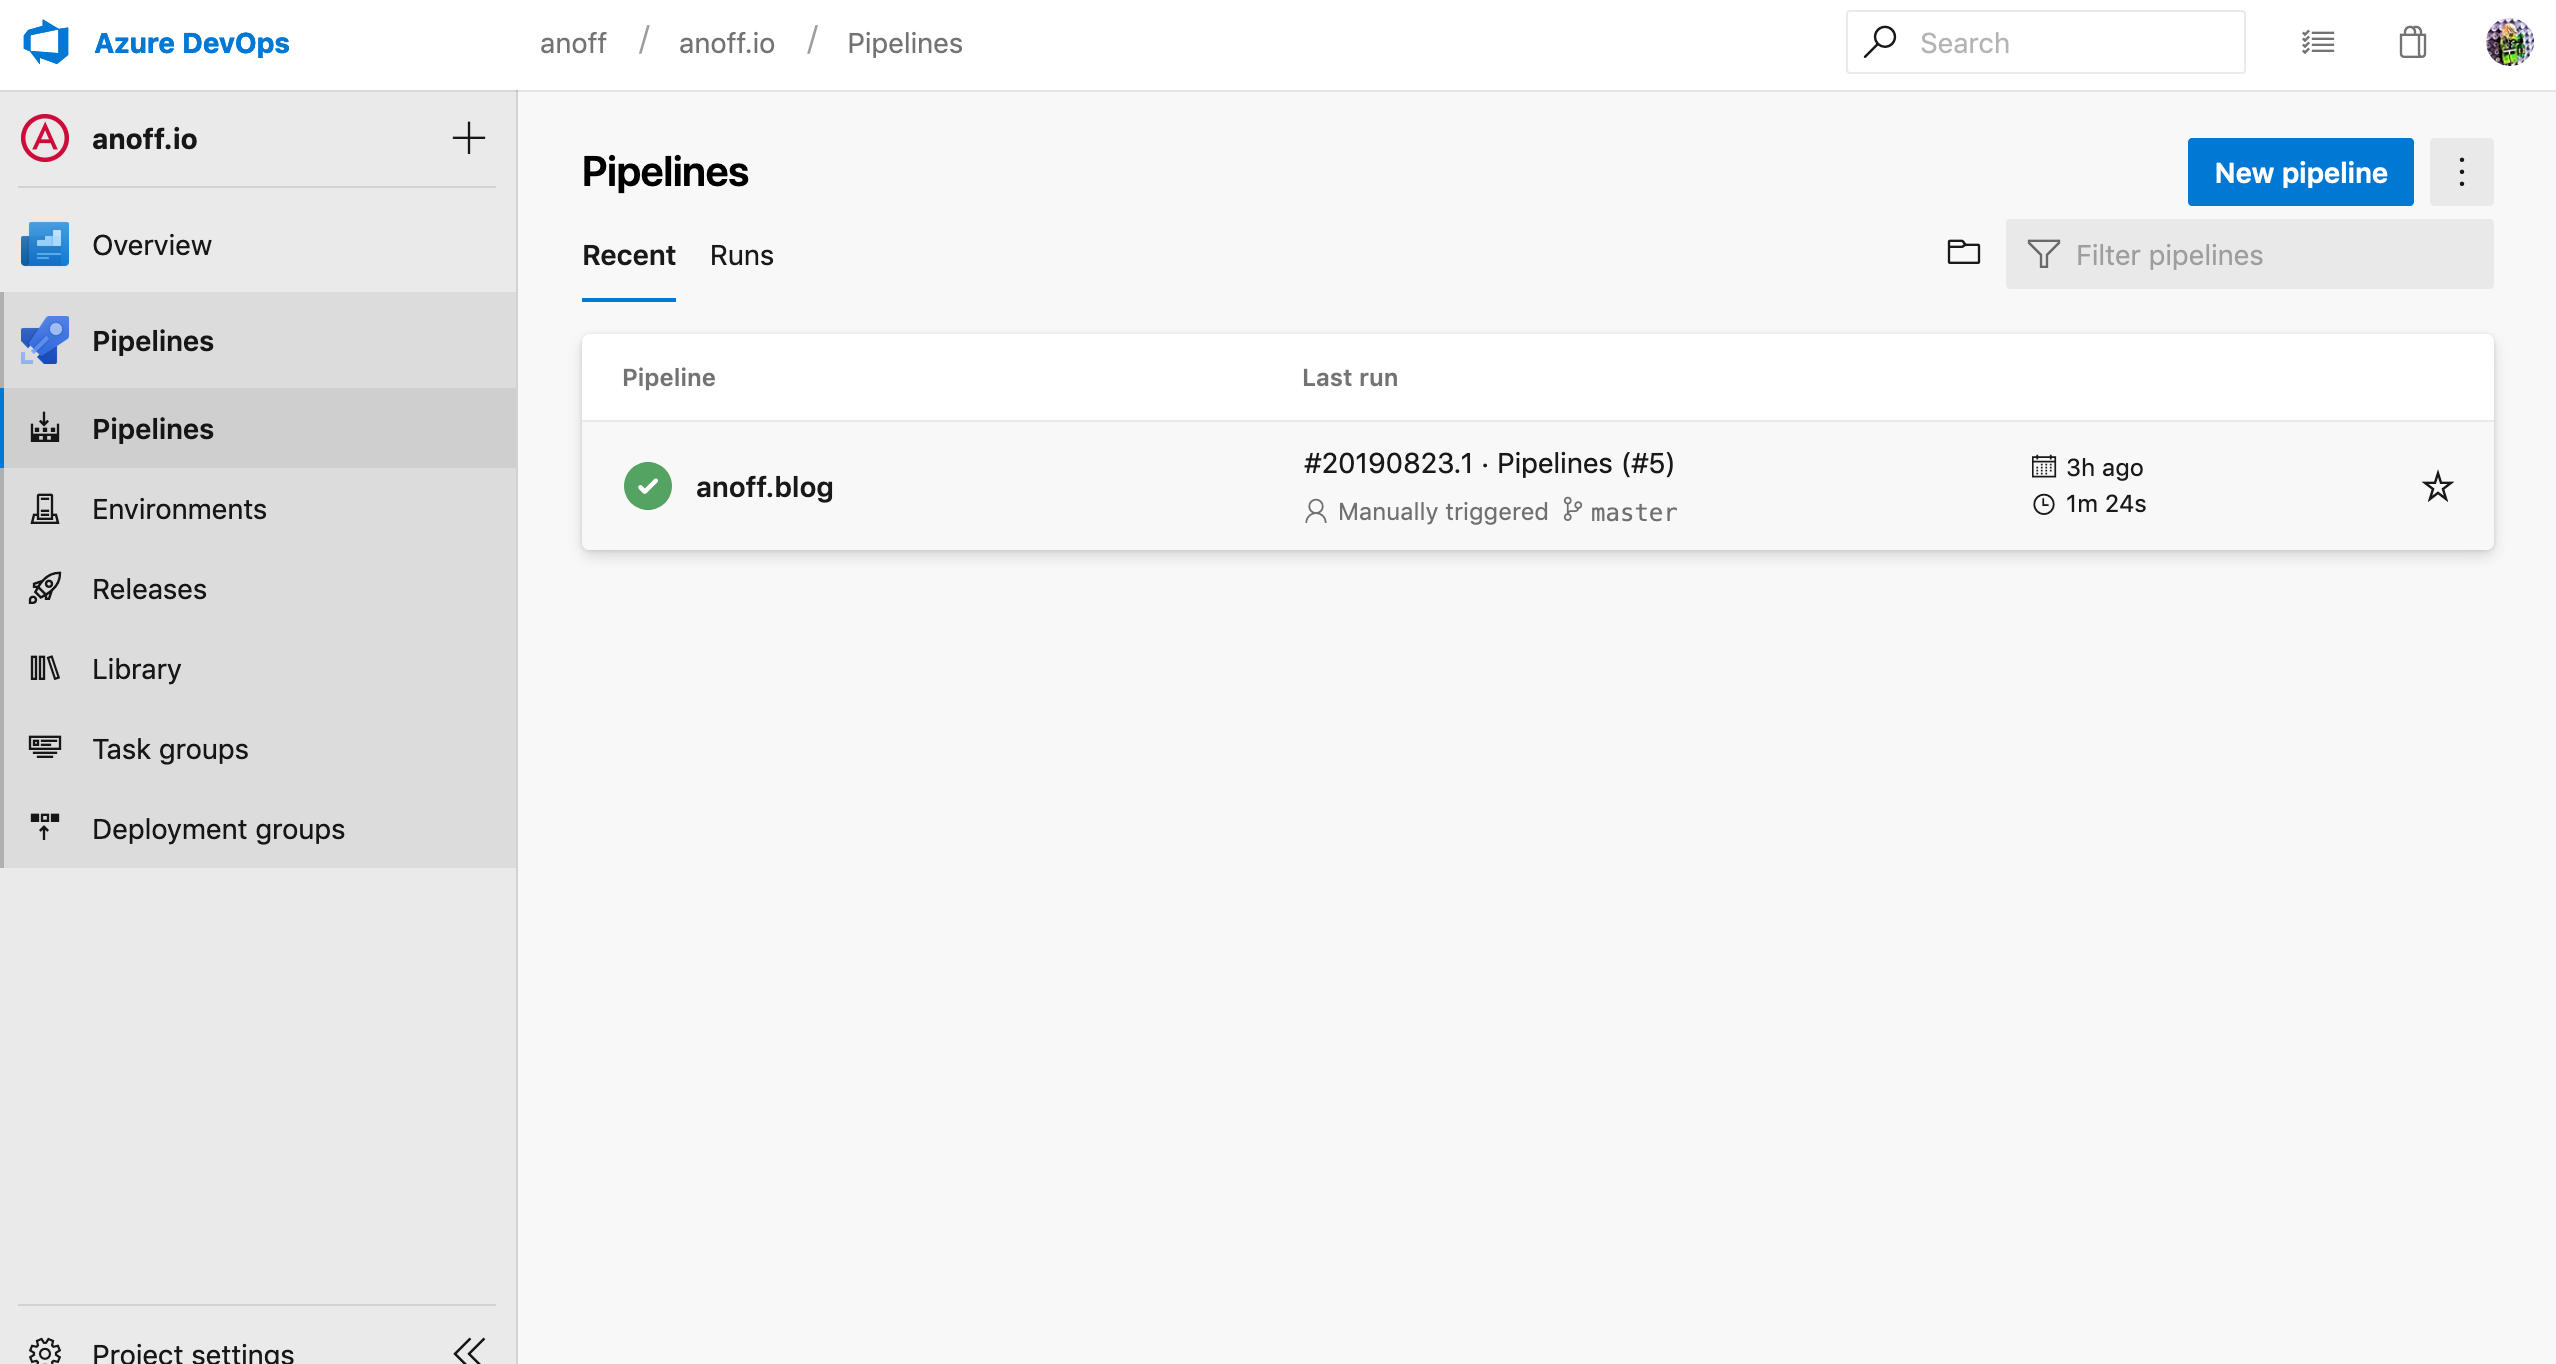
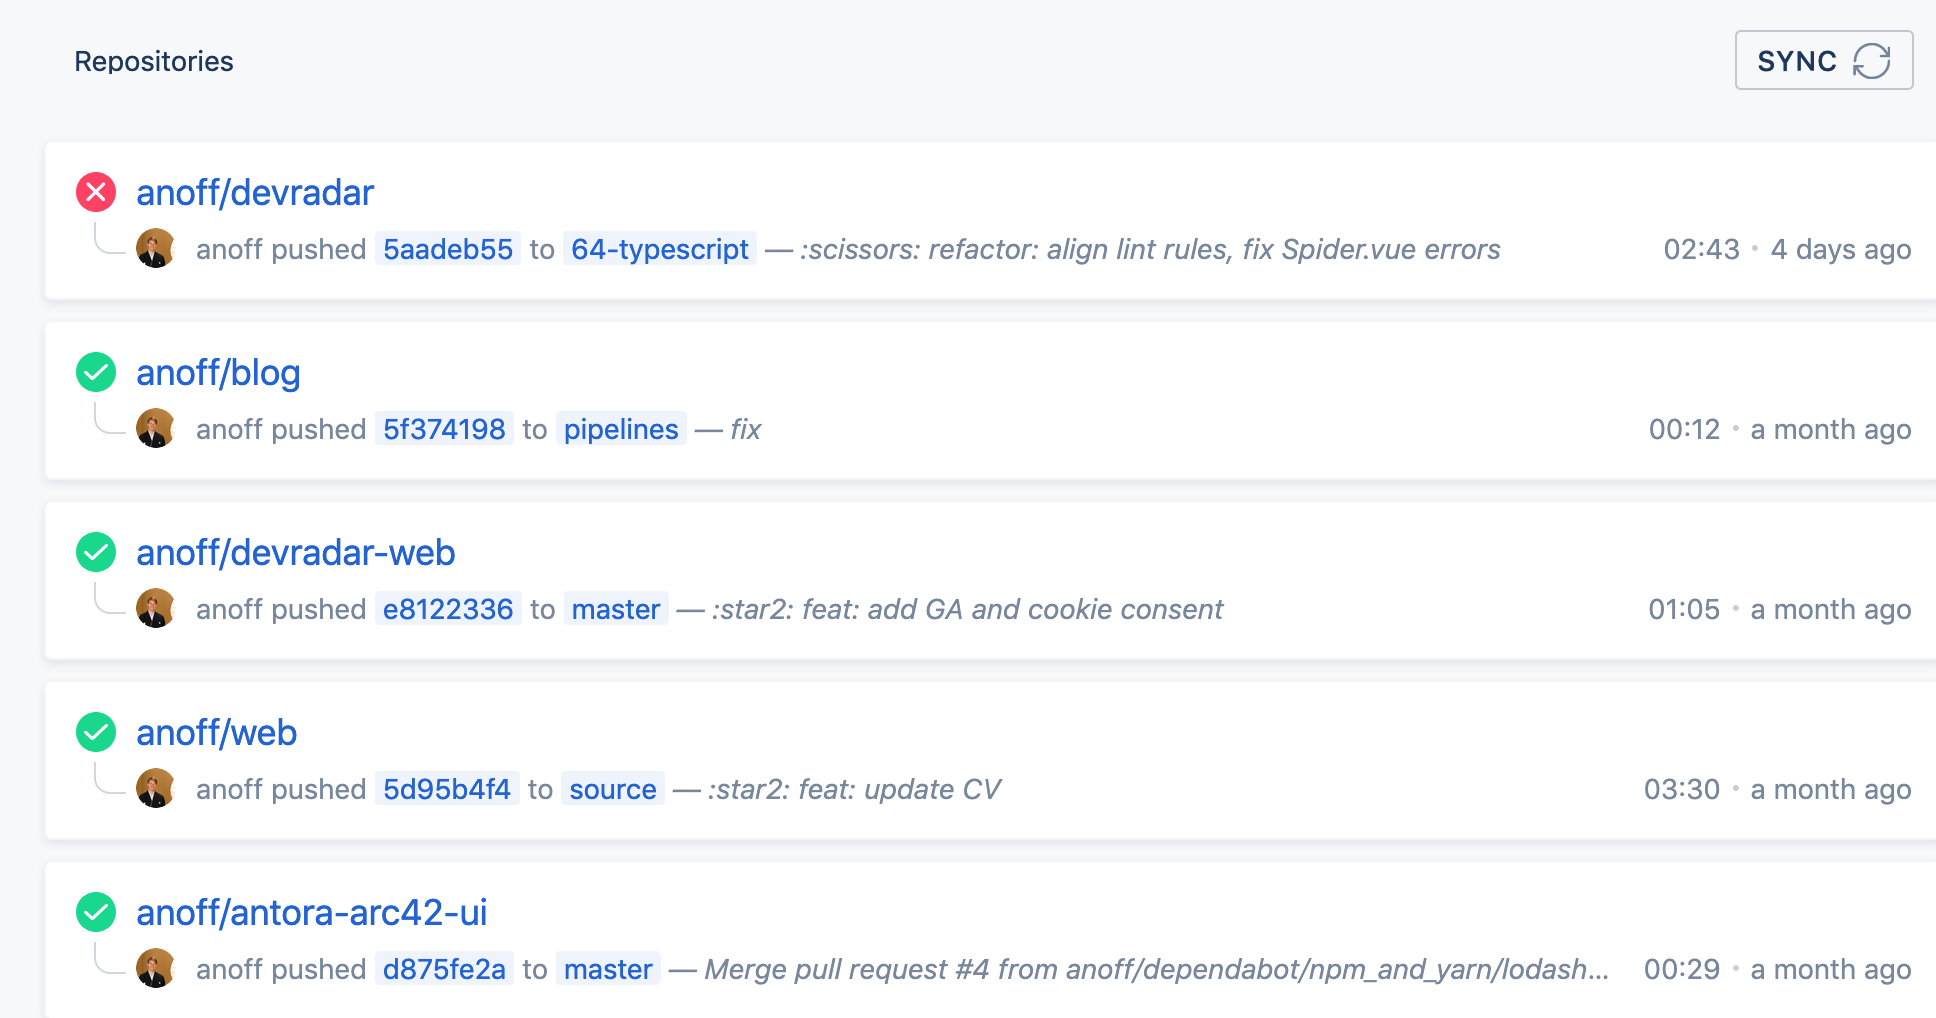
This was new at first because most CI services out there just create one project/pipeline per repository. Even after several weeks I do not really get familiar with this additional layer that the project represents.
drone.io repositories overview
Summary
Migrating to Azure Pipelines from an existing CI service is not a very complicated task if your existing workload fulfills the following requirements - which should be best practice 😉
- no customized agents, instead bundle tools into docker images that serve as runtime for the CI job
- no hard dependency on service-specific plugins/features
- secrets can be easily injected via environment variables or arguments
- your pipeline is modular - not really necessary but a single job, single step pipeline looks weird on the UI
If you have any questions drop me a DM via Twitter or leave a comment 👋